This post was last updated on February 28th, 2020 at 09:27 am
As a developer when you work with WordPress, you might find yourself in a situation like, not having the login credentials for the admin user, trying to recover a hacked WordPress site or you are locked out of your administrative account. If any of these happens or could be any other reason, you will need to create a new WordPress user (with an Administrator role) to regain access to the dashboard.
In this post, I will show you how you can manually create a WordPress Admin User via MySQL Database Using PHPMyAdmin.
Note: Must have access to cPanel/Hosting Control Panel of the site. Ask the web site owner for the details of cPanel login. Also, make sure to backup the database before making any MySQL edits.
Step 1: Access The MySQL Database of the Web Site
- Log into your cPanel/Control panel
- Click phpMyAdmin from Database section

Step 2: Find the WordPress Users table
- Once you are in PhpMyAdmin, from left-hand sidebar click on your specific WordPress database
- After the database information loads Find and click on the WP Users table (assuming database table prefix is set to "wp_").
- Next, click on the “insert” tab
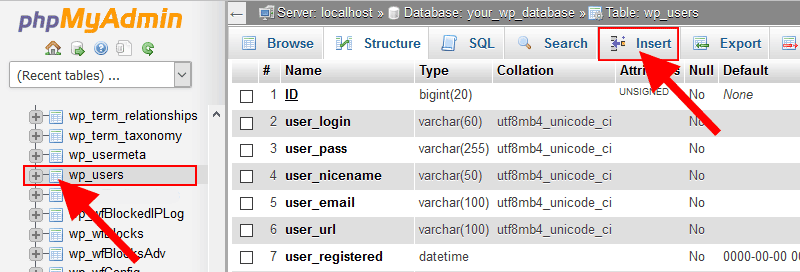
Step 3: Inserting a New Record in the WP Users Table
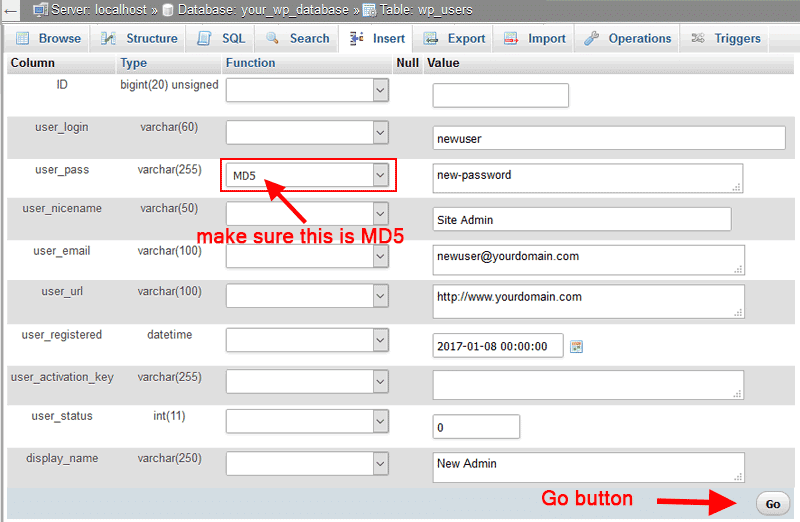
Fill in the following fields to insert a new user record:
- ID – leave this field empty (it will be assigned automatically)
- user_login – insert the username that will be used to access the Admin area.
- user_pass – type a password for the username. Make sure MD5 is selected in the Function column.
- user_nicename – (optional, can be added later) type a URL-friendly name for the user.
- user_email – type the email associated with this account.
- user_url – (optional, can be added later) this would be the URL to your website.
- user_registered – set the date/time for when this user is registered.
- user_status – set this to 0.
- display_name –(optional, can be added later) put the name you like to display for this user on the site.
- Now Click on the Go Button (you should see a success message)
Click the "Browse" tab to verify that the new user record has been inserted correctly (see screenshot below).
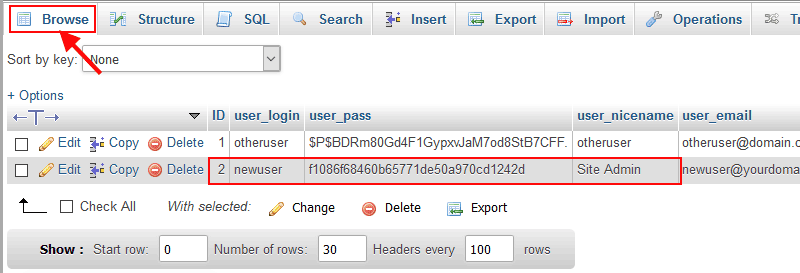
Take a note of the newly created "ID" field value (this ID field’s value will be use in the next step). Here the ID is 2.
Step 4: Inserting Newly created User Meta Values
In the final step, we will assign some user meta values to wp_usermeta table for the user account that we have we just created.
So, click on the wp_usermeta table and click on the Insert tab, just like we did in the previous step.We will add the following two meta value in this table.
- umeta_id – leave this field empty (it will be auto-generated)
- user_id – this will be the same ID of the user from the wp_users table, which is 2.
- meta_key – this should be
wp_capabilities(assuming database table prefix is set to "wp_"). - meta_value – insert this:
a:1:{s:13:"administrator";s:1:"1";}
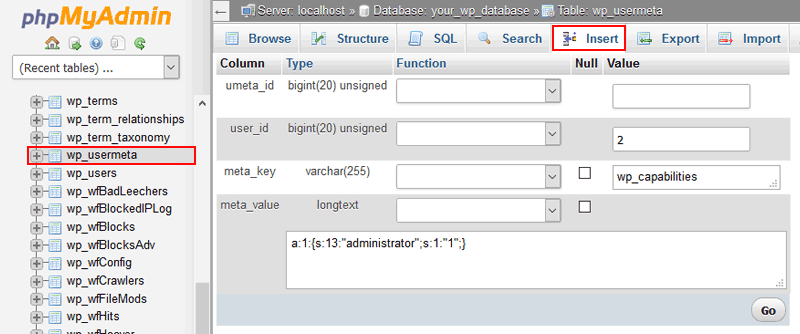
Insert another row with the following information:
- umeta_id – leave this field empty (it will be auto-generated)
- user_id – this will be the same ID of the user from the wp_users table, which is 2.
- meta_key – this should be
wp_user_level(assuming database table prefix is set to "wp_"). - meta_value –
10
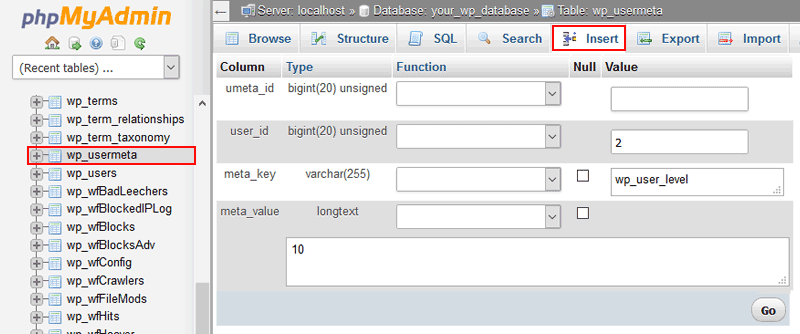
Finally, click on the last Go button.
You have successfully created a new WordPress user with an Administrator role. Now you can visit your WordPress admin login page and use the specified username and password to log in.
Once you logged in, you must go to user edit screen to change the password of the newly created user or simply click on the Save button which will allow WordPress to go through and optimize the information.
All the above steps using simple MySQL Queries
Now, Copy and paste the followingMySQL queries (in PHPMyAdmin SQL query box) which will create an Administrator user with loginid: loginname and Password: @PassWord#
INSERT INTO `wp_users`
(`ID`, `user_login`, `user_pass`, `user_nicename`, `user_email`, `user_url`, `user_registered`, `user_activation_key`, `user_status`, `display_name`) VALUES
(NULL, 'loginname', MD5('@PassWord#'), 'nice-name', 'email@domain.com', 'http://www.domain.com', '2017-06-10 03:37:00', '', '0', 'Your Name');
After executing above query you will get the "ID" (user id ) and before executing the following query you must replace user_id (3) with the 'ID' number in the following query.
INSERT INTO `wp_usermeta` (`umeta_id`, `user_id`, `meta_key`, `meta_value`) VALUES
(NULL, '3', 'wp_capabilities', 'a:1:{s:13:\"administrator\";s:1:\"1\";}'),
(NULL, '3', 'wp_user_level', '10'),
(NULL, '3', 'nickname', 'NickName'),
(NULL, '3', 'first_name', 'First Name'),
(NULL, '3', 'last_name', 'Last Name');


4 Comments
You can post comments in this post.
My blog was hacked (Russians again) and just about destroyed with a redirected URL. Once the text was identified, the site disappeared. It is currently blank. My own logins, both for the cpanel and for WordPress, were deleted. I am now at the mercy of strangers to rebuild it piece by piece. Thanks to you I can now log into the WordPress blog, where, even if they have disappeared from view, my writings remain.
I had followed several instructions, which did not work. I would make one suggestion: I think I am a bit denser than usual, but making a bit clearer that the ID entry is the record number of the record in the wp-users database would be helpful.
Jo Lockley 8 years ago
This was a great article with lots of good examples and resources. Really is very nice. Thank you very much.
Wordpress Programmer 8 years ago
THANKS IT WORKS FOR ME.
Qammar Iqbal 7 years ago
This is something helpful to create admin user via phpmyadmin. I know one more method via phpmyadmin but a little bit similar to your one. Anyways thanks for this great information.
Saddam Kassim 7 years ago
Leave A Reply