WooCommerce is a great E-Commerce system for WordPress. By default, WooCommerce comes with a number of useful pages to aid users/customers in the process of purchasing things from your site. However user registration or my account page may seems incomplete when your customers are growing and you can’t plan a promotional or marketing campaigns to your target customers because you can’t classify your customers into different groups. Whatever the idea is this article describes how you can add additional fields to the WooCommerce registration or My Account form.
Step 1: Enable the registration form
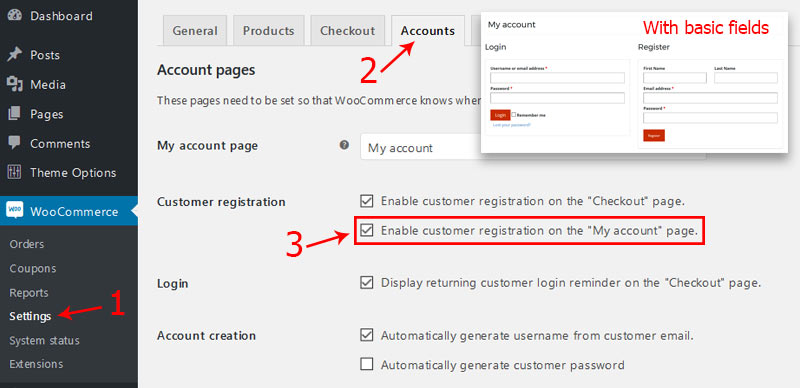
In order to see the registration form, the first thing we need to do is make a change on the “Accounts” settings page.
Go to WooCommerce → Settings → Accounts and find the checkbox Enable customer registration on the “My account” page and make sure it is checked:

Step 2: Add Your New WooCommerce Registration Form Fields
Woocommerce has a callback/hook to display custom html before their registration form.
woocommerce_register_form_start– Appears before the “Email” fieldwoocommerce_register_form– Appears after the “Password” field
function.php file of your active theme (or child theme)./* To add WooCommerce registration form custom fields. */
function WC_extra_registation_fields() {?>
<p class="form-row form-row-first">
<label for="reg_billing_gender"><?php _e( 'Gender', 'woocommerce' ); ?></label>
<select class="input-text" name="billing_gender" id="reg_billing_gender">
<option <?php if ( ! empty( $_POST['billing_gender'] ) && $_POST['billing_gender'] == 'male') esc_attr_e( 'selected' ); ?> value="male">Male</option>
<option <?php if ( ! empty( $_POST['billing_gender'] ) && $_POST['billing_gender'] == 'female') esc_attr_e( 'selected' ); ?> value="female">Female</option>
<option <?php if ( ! empty( $_POST['billing_gender'] ) && $_POST['billing_gender'] == 'other') esc_attr_e( 'selected' ); ?> value="other">Other</option>
</select>
</p>
<p class="form-row form-row-last">
<label for="reg_billing_phone"><?php _e( 'Phone Number', 'woocommerce' ); ?> <span class="required">*</span></label></label>
<input type="text" class="input-text" name="billing_phone" id="reg_billing_phone" value="<?php esc_attr_e( $_POST['billing_phone'] ); ?>" />
</p>
<div class="clear"></div>
<p class="form-row form-row-wide">
<label for="reg_user_hearaboutus"><?php _e( 'How Did You Hear About Us?', 'woocommerce' ); ?> <span class="required">*</span></label>
<label style="float: left; margin-right: 10px;font-weight: normal;" for="from_facebook">
<input <?php checked( $_POST['user_hearaboutus'], 'facebook', true ); ?> class="input-radio" type="radio" name="user_hearaboutus" id="from_facebook" value="facebook"> Facebook</label>
<label style="float: left; margin-right: 10px;font-weight: normal;" for="from_twitter">
<input <?php checked( $_POST['user_hearaboutus'], 'twitter' ); ?> class="input-radio" type="radio" name="user_hearaboutus" id="from_twitter" value="twitter"> Twitter</label>
<label style="float: left; margin-right: 10px;font-weight: normal;" for="from_google">
<input <?php checked( $_POST['user_hearaboutus'], 'google' ); ?> class="input-radio" type="radio" name="user_hearaboutus" id="from_google" value="google"> Google</label>
<label style="float: left; margin-right: 10px;font-weight: normal;" for="from_friends">
<input <?php checked( $_POST['user_hearaboutus'], 'friends' ); ?> class="input-radio" type="radio" name="user_hearaboutus" id="from_friends" value="friends"> Friends</label>
<label style="float: left; margin-right: 10px;font-weight: normal;" for="from_emails">
<input <?php checked( $_POST['user_hearaboutus'], 'emails' ); ?> class="input-radio" type="radio" name="user_hearaboutus" id="from_emails" value="emails"> Newsletters</label>
</p>
<div class="clear"></div>
<?php
}
add_action( 'woocommerce_register_form', 'WC_extra_registation_fields');
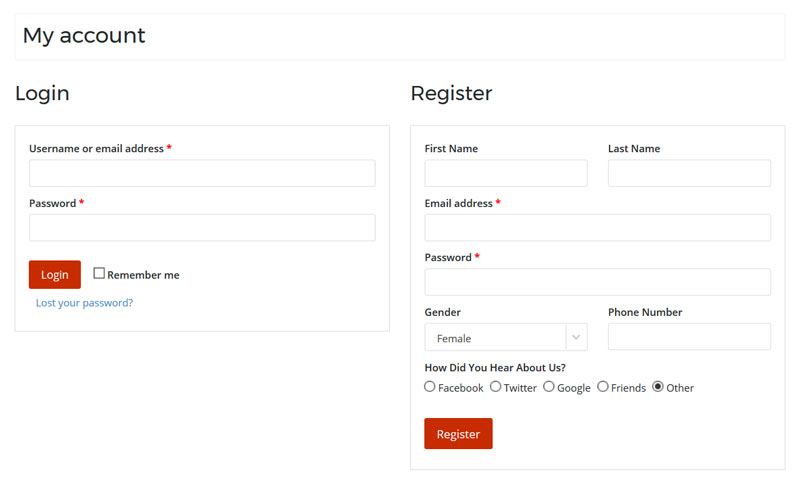
Once you’ve added the above example codes it will show like below. You may need to add CSS for field styling. in this I’ve used my custom CSS to style HTML select dropdown

Step 3: Validating The Custom Form Fields
In this step we are going to validate the form fields.However, it is totally optional and depends on your business logic that what you want. If you don’t want to validate this then remove * from above code and skip this section.
So to validate we will use the woocommerce_register_post action. See the example below:
/* To validate WooCommerce registration form custom fields.  */
function WC_validate_reg_form_fields($username, $email, $validation_errors) {
    if (isset($_POST['billing_phone']) && empty($_POST['billing_phone']) ) {
        $validation_errors->add('billing_phone_error', __('Phone number is required!', 'woocommerce'));
    }

    /*if (isset($_POST['billing_phone']) && !is_numeric($_POST['billing_phone'])) {
        $validation_errors->add('billing_phone_error', __('Valid Phone number is required!', 'woocommerce'));
    }*/

    if (!isset($_POST['user_hearaboutus']) || empty($_POST['user_hearaboutus'])) {
        $validation_errors->add('user_hearaboutus_error', __('Please select how did you hear about us!', 'woocommerce'));
    }

    return $validation_errors;
}

add_action('woocommerce_register_post', 'WC_validate_reg_form_fields', 10, 3);
Step 4: Saving Custom Fields
Finally we just need to save the custom fields in the database. We should save that custom fields in user profile and to do this we’ll use the woocommerce_created_customer action:
/* To save WooCommerce registration form custom fields. */
function WC_save_registration_form_fields($customer_id) {

    //Gender field
    if (isset($_POST['billing_gender'])) {
        update_user_meta($customer_id, 'billing_gender', sanitize_text_field($_POST['billing_gender']));
    }
    //Phone field
    if (isset($_POST['billing_phone'])) {
        update_user_meta($customer_id, 'billing_phone', sanitize_text_field($_POST['billing_phone']));
    }
    //Hear about us field
    if (isset($_POST['user_hearaboutus']) && !empty($_POST['user_hearaboutus'])) {
        update_user_meta($customer_id, 'user_hearaboutus', sanitize_text_field($_POST['user_hearaboutus']));
    }
}

add_action('woocommerce_created_customer', 'WC_save_registration_form_fields');
Step 5: Show Custom Fields on WooCommerce My Account Page

Now to administrator those custom fields you have use the following 2 hook.
woocommerce_edit_account_form– Show custom fields on my account pagewoocommerce_save_account_details– Save the custom fields on my account page
function WC_edit_account_form() {
    $user_id = get_current_user_id();
    $current_user = get_userdata( $user_id );
    if (!$current_user) return;

    $billing_gender = get_user_meta( $user_id, 'billing_gender', true );
    $billing_phone = get_user_meta( $user_id, 'billing_phone', true );
    $user_hearaboutus = get_user_meta( $user_id, 'user_hearaboutus', true );
    ?>

    <fieldset>
        <legend>Other information</legend>

        <p class="form-row form-row-first">
        <label for="reg_billing_gender"><?php _e( 'Gender', 'woocommerce' ); ?></label>
        <select class="input-text" name="billing_gender" id="reg_billing_gender">
            <option <?php if ( esc_attr($billing_gender) == 'male') esc_attr_e( 'selected' ); ?> value="male">Male</option>
            <option <?php if ( esc_attr($billing_gender) == 'female') esc_attr_e( 'selected' ); ?> value="female">Female</option>
            <option <?php if ( esc_attr($billing_gender) == 'other') esc_attr_e( 'selected' ); ?> value="other">Other</option>
        </select>
        </p>

        <p class="form-row form-row-last">
            <label for="reg_billing_phone"><?php _e( 'Phone Number', 'woocommerce' ); ?> <span class="required">*</span></label></label>
            <input type="text" class="input-text" name="billing_phone" id="reg_billing_phone" value="<?php echo esc_attr($billing_phone); ?>" />
        </p>

        <div class="clear"></div>

        <p class="form-row form-row-wide">
            <label for="reg_user_hearaboutus"><?php _e( 'How Did You Hear About Us?', 'woocommerce' ); ?> <span class="required">*</span></label>

            <label for="from_facebook">
                <input <?php checked( esc_attr($user_hearaboutus), 'facebook', true ); ?> class="input-radio" type="radio" name="user_hearaboutus" id="from_facebook" value="facebook"> Facebook
            </label>

            <label for="from_twitter">
                <input <?php checked( esc_attr($user_hearaboutus), 'twitter' ); ?> class="input-radio" type="radio" name="user_hearaboutus" id="from_twitter" value="twitter"> Twitter
            </label>

            <label for="from_google">
                <input <?php checked( esc_attr($user_hearaboutus), 'google' ); ?> class="input-radio" type="radio" name="user_hearaboutus" id="from_google" value="google"> Google
            </label>

            <label for="from_friends">
                <input <?php checked( esc_attr($user_hearaboutus), 'friends' ); ?> class="input-radio" type="radio" name="user_hearaboutus" id="from_friends" value="friends"> Friends
            </label>

            <label for="from_emails">
                <input <?php checked( esc_attr($user_hearaboutus), 'emails' ); ?> class="input-radio" type="radio" name="user_hearaboutus" id="from_emails" value="emails"> Newsletters
            </label>
        </p>

        <div class="clear"></div>
    </fieldset>
    <?php
}

function WC_save_account_details( $user_id ) {
    //Gender field
    update_user_meta($user_id, 'billing_gender', sanitize_text_field($_POST['billing_gender']));
    //Phone field
    update_user_meta($user_id, 'billing_phone', sanitize_text_field($_POST['billing_phone']));
    //Hear about us field
    update_user_meta($user_id, 'user_hearaboutus', sanitize_text_field($_POST['user_hearaboutus']));
}

add_action( 'woocommerce_edit_account_form', 'WC_edit_account_form' );
add_action( 'woocommerce_save_account_details', 'WC_save_account_details' );
Once logged you can find these fields on the account details edit page. You can see the values from registration form already being populated.
I hope you found this post helpful. Let me know in the comments if you’ve got any questions.


15 Comments
You can post comments in this post.
Hey there! Nice tutorial, thanks for sharing!
I’d like to know if there is a way to see all this data from the backoffice once the new client is registered.
Thanks!
Guille 8 years ago
Hello,
I would like to know also how one can see these fields in WP user backend screen.
Thanks!
Daniel 7 years ago
Great tutorial. Worked like a charm.
I too would like to know how to populate these fields in the WP user backend?
Kevin Lydon 7 years ago
Hi Parameshwar,
Thanks for this tutorial. Everything works perfectly. However, as an admin I cannot see these fields anywhere in the backend with user details. What can I do to see these fields?
Also, these fields are not available when a user registers directly during checkout process. How can I make that change?
Thanks,
Priyanka.
Priyanka 7 years ago
Hey Parameshwar, I really appreciate you for writing such an amazing tutorial adding custom fields to WooCommerce registration form. I have been using this code but i am having some issues
function wpblog_register_fields() {?>
*
<input type="text" class="input-text" name="registration_name" value="” />
<?php
}
add_action( 'woocommerce_register_form_start', 'wpblog_register_fields' );
I have seen this code here www.wpblog.com/add-r…ce-stores/
Alexander 7 years ago
Hi! Thanks for this tutorial. Is there any way to send all those user data to admin after form submit?
Thanks in advance!
Lukas 7 years ago
Can this method be used to save Shipping & Billing Address?
BigBankClub 7 years ago
For those who want to see the content of a particular field in the admin area, try this code. user_hearaboutus is my custom field
/*add custom column to admin area, put this code in the functions.php */
function fyndaa_manage_users_columns( $columns ) {
$columns[ ‘user_hearaboutus’ ] = ‘Feedback’;
return $columns;
}
add_filter( ‘manage_users_columns’, ‘fyndaa_manage_users_columns’, 10, 1 );
/* to display the custom field content in the admin area */
function fyndaa_manage_users_custom_column( $output, $column_key, $user_id ) {
switch ( $column_key ) {
case ‘user_hearaboutus’:
$value = get_user_meta( $user_id, ‘user_hearaboutus’, true );
return $value;
break;
default: break;
}
// if no column slug found, return default output value
return $output;
}
add_filter( ‘manage_users_custom_column’, ‘fyndaa_manage_users_custom_column’, 10, 1 );
Geoffrey 7 years ago
thanks for the code and o added the phone number fields in woocommerce registration page, how to know the existence of phone number just like the email address to prevent fake account creation (if the phone number already exist then show an error if new number then create a new account please help me
nani 7 years ago
Hi.
How to do make google recaptcha v3 ?
yemliha 6 years ago
Hi,
Thank you for this great tutorial.
I have a problem though. When I add a file input field to ‘woocommerce_register_form’ like this:
I cannot access the $_FILES variable. It only gives the filename in a $_POST. Whether I try to catch $_FILES in a hook or in the header.php, it’s always empty.
Can anyone give me an advice on how to solve this?
Thank you in advance.
David 6 years ago
Never mind. I figured it out.
The problem was the form tag missing the enctype=”multipart/form-data”.
David 6 years ago
Hi, tell me, is it possible to choose the role of the user during registration? I can choose a customer and a seller, but how do I add another role like super seller?
Dmitry 5 years ago
function create_new_role() {
//add the special customer role
add_role(
‘special-customer’,
“Special Customer”,
array(
‘read’ => true,
‘delete_posts’ => false
)
);
}
add_action(‘admin_init’, ‘create_new_role’);
function proyinfo_change_role( $order_id ) {
// get all the order data
$order = new WC_Order($order_id);
//get the user email from the order
$user = $order->get_user();
// if the this is a registered user and this user is not an admin
if( false != $user && !user_can($user, ‘administrator’) ){
// our new role name
$role = ‘special-customer’;
//this code replaces the existing user roles with the new one.
$user->set_role($role);
//or use the following if you would like to keep the previously assigned roles and only add the new role
//$user->add_role($role);
}
}
//add this newly created function to the thank you page
add_action( ‘woocommerce_thankyou’, ‘proyinfo_change_role’, 100, 1 );
P. Roy 5 years ago
That’s great tutorial but if you can guide how to add fields in registration form manually? The fields are not adding in the registration form using a plugin. I am trying to add it manually using a code that is in this complete guide wpitech.com/add-w…rm-fields/. Is there any alternative to do this? It would be really helpful if you could help me to add fields in the registration form.
function Woo_register_fields() {?>
*
<input type="text" class="input-text" name="registration_name" value="” />
<?php
}
add_action( 'woocommerce_register_form_start', 'Wooregister_fields' );
James 5 years ago
Leave A Reply