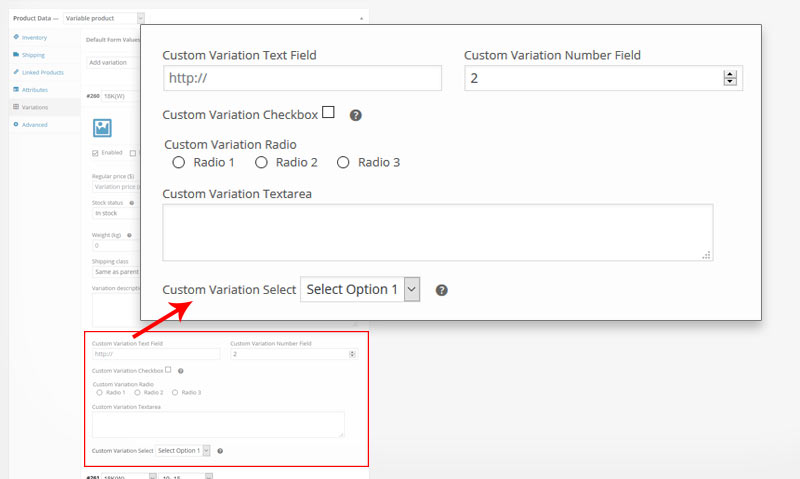
In one of my previous WooCommerce article, I discussed How to Add WooCommerce Custom Fields to Products In this post, I will discuss how to add custom fields to WooCommerce Product Variations. Once custom fields are enabled to your product variations it will feel native to WooCommerce, making it easy for your shop managers to enter additional product information.
WooCommerce Custom Fields for Product Variations

The method is more or less the same what I explained in my previous post regarding custom fields. Just like before we will be working on the file functions.php (default location to add custom function) of your theme folder.
Specific Action Hook
There is two specific hook to achieve this,
- woocommerce_product_after_variable_attributes — contains code for displaying the newly added fields.
- woocommerce_save_product_variation — will save the values in the custom fields.
The Complete Code
// Add Variation Custom fields

//Display Fields in admin on product edit screen
add_action( 'woocommerce_product_after_variable_attributes', 'woo_variable_fields', 10, 3 );

//Save variation fields values
add_action( 'woocommerce_save_product_variation', 'save_variation_fields', 10, 2 );

// Create new fields for variations
function woo_variable_fields( $loop, $variation_data, $variation ) {

  echo '<div class="variation-custom-fields">';

      // Text Field
      woocommerce_wp_text_input(
        array(
          'id'          => '_text_field['. $loop .']',
          'label'       => __( 'Custom Variation Text Field', 'woocommerce' ),
          'placeholder' => 'http://',
          //'desc_tip'    => true,
          'wrapper_class' => 'form-row form-row-first',
          //'description' => __( 'Enter the custom value here.', 'woocommerce' ),
          'value'       => get_post_meta($variation->ID, '_text_field', true)
        )
      );

      // Number Field
      woocommerce_wp_text_input(
        array(
          'id'          => '_number_field['. $loop .']',
          'label'       => __( 'Custom Variation Number Field ', 'woocommerce' ),
          //'desc_tip'    => true,
          'wrapper_class' => 'form-row form-row-last',
          //'description' => __( 'Enter the custom number here.', 'woocommerce' ),
          'type'              => 'number',
          'value'       => get_post_meta($variation->ID, '_number_field', true),
          'custom_attributes' => array(
                  'step'  => '2',
                  'min' => '0'
                )
        )
      );

      // Checkbox
      woocommerce_wp_checkbox(
      array(
        'id'            => '_checkbox['. $loop .']',
        'label'         => __('Custom Variation Checkbox ', 'woocommerce' ),
        'desc_tip'    => true,
        'description'   => __( 'Check me!', 'woocommerce' ),
        //'wrapper_class' => 'form-row form-row-first',
        'value'         => get_post_meta($variation->ID, '_checkbox', true)
        )
      );

      // Checkbox
      woocommerce_wp_radio(
      array(
        'id'            => '_radio['. $loop .']',
        'label'         => __('Custom Variation Radio ', 'woocommerce' ),
        //'desc_tip'    => true,
        //'description'   => __( 'Check me!', 'woocommerce' ),
        //'wrapper_class' => 'form-row form-row-last',
        'value'         => get_post_meta($variation->ID, '_radio', true),
        'options' => array(
          'one'   => __( 'Radio 1', 'woocommerce' ),
          'two'   => __( 'Radio 2', 'woocommerce' ),
          'three' => __( 'Radio 3', 'woocommerce' )
          )
        )
      );

      // Textarea
      woocommerce_wp_textarea_input(
        array(
          'id'          => '_textarea['. $loop .']',
          'label'       => __( 'Custom Variation Textarea ', 'woocommerce' ),
          //'desc_tip'    => true,
          // 'wrapper_class' => 'form-row',
          'placeholder' => '',
          //'description' => __( 'Enter the custom value here.', 'woocommerce' ),
          'value'       => get_post_meta($variation->ID, '_textarea', true)
        )
      );

      // Select
      woocommerce_wp_select(
      array(
        'id'          => '_select['. $loop .']',
        'label'       => __( 'Custom Variation Select ', 'woocommerce' ),
        'desc_tip'    => true,
        // 'wrapper_class' => 'form-row',
        'description' => __( 'Choose a value.', 'woocommerce' ),
        'value'       => get_post_meta($variation->ID, '_select', true),
        'options' => array(
          'one'   => __( 'Select Option 1', 'woocommerce' ),
          'two'   => __( 'Select Option 2', 'woocommerce' ),
          'three' => __( 'Select Option 3', 'woocommerce' )
          )
        )
      );

      // Hidden field
      woocommerce_wp_hidden_input(
      array(
        'id'    => '_hidden_field['. $loop .']',
        'value' => 'hidden_value'
        )
      );

  echo "</div>";

}

/** Save new fields for variations */
function save_variation_fields( $variation_id, $i) {

    // Text Field
    $text_field = stripslashes( $_POST['_text_field'][$i] );
    update_post_meta( $variation_id, '_text_field', esc_attr( $text_field ) );

    // Number Field
    $number_field = $_POST['_number_field'][$i];
    update_post_meta( $variation_id, '_number_field', esc_attr( $number_field ) );

    // Textarea
    $textarea = $_POST['_textarea'][$i];
    update_post_meta( $variation_id, '_textarea', esc_html( $textarea ) );

    // Select
    $select = $_POST['_select'][$i];
    update_post_meta( $variation_id, '_select', esc_attr( $select ) );

    // Checkbox
    $checkbox = isset( $_POST['_checkbox'][$i] ) ? 'yes' : 'no';
    update_post_meta( $variation_id, '_checkbox', $checkbox );

    // Radio
    $radio = $_POST['_radio'][$i];
    update_post_meta( $variation_id, '_radio', esc_attr( $radio ) );

    // Hidden field
    $hidden = $_POST['_hidden_field'][$i];
    if( ! empty( $hidden ) ) {
      update_post_meta( $variation_id, '_hidden_field', esc_attr( $hidden ) );
    }
}
Displaying Custom Fields Values on the Frontend
// Custom Product Variation
add_filter( 'woocommerce_available_variation', 'custom_load_variation_settings_products_fields' );

function custom_load_variation_settings_products_fields( $variations ) {
  $variations['variation_custom_select'] = get_post_meta( $variations[ 'variation_id' ], '_select', true );
  $variations['variation_custom_textarea'] = get_post_meta( $variations[ 'variation_id' ], '_textarea', true );
  return $variations;
}
Using, wp.template it is now easy to display variations custom fields value. Next, make changes to the custom template that displays the variation fields. The file is named variation.php (located in wp-plugins/plugins/woocommerce/templates/single-product/add-to-cart/).
variation.php file directly. Instead, create a copy in the folder woocommerce/templates/single-product/add-to-cart/ in your theme folder.<div class="woocommerce-variation-custom-textarea">
{{{ data.variation.variation_custom_textarea}}}
</div>
<div class="woocommerce-variation-custom-select">
{{{ data.variation.variation_custom_select}}}
</div>
I hope you found this post useful. Please be generous to help others by sharing it on Facebook, Twitter, or LinkedIn using the buttons below.


7 Comments
You can post comments in this post.
This worked brilliantly for me, it was exactly what i needed, it did break a few things design wise but they just needed some css to fix.
Brent 8 years ago
Hi!
Thanks for this post. But in my site just not work. I am doing all step, like you write in post. And i have just this prntscr.com/fit49z
In backand all fine, add, save, all work. But on frontend dont work. Please help my(((
Thanks for your help!
I have WC 3.0.7 and WP 4.7.5
Dmitry 8 years ago
hello
i’m struggling with adding new custom product fields to my WC site.
basically what I need is to add a new custom sale price block under the general tab (for simple product and variation product), which will contain a text field for the price (this is simple and i’ve managed to do it), but instead of the description, I’d like to add a Schedule button to show another 2 fields for the 2 datepickers (start and end of the offer), just like the default sale price of WC.
how can I achieve that?
thanks
kind regards
Peter 7 years ago
Can’t believe how good this is! Thank you
Adriano 7 years ago
Hello,
Thank you for great tutorial, Do you perhaps know how to display the field in the export csv file using CSV Import Suite.
Clement Tau 7 years ago
Did you ever find a solution?
RebootKidd 7 years ago
Is there a way to add text fields for each variations so customers can enter the values in the text field from product page
Sandeep Tete 7 years ago
Leave A Reply