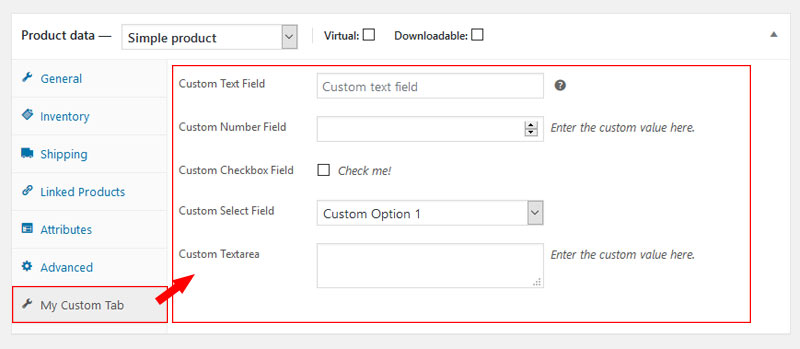
While adding or updating WooCommerce products we have a section named “Product Data” just below the main content editor. In this section, we have various tabs like general, inventory, linked products etc with different types of fields. But sometimes we need to add our own custom product fields and it is always a good idea to segment custom product fields in a separate section, especially when there is no better position available within the existing product data tabs/panels. In this post, we will go a bit more in-depth to WooCommerce customization that is I will show you how to add WooCommerce custom product fields in a custom product data tab.
This tutorial is in continuation to one of my previous WooCommerce posts, How to Add WooCommerce Custom Fields to Products. If you haven’t already, you should read that first for better understanding!
Step 1: Creating the Tab
The example code below will add a custom tab named “My Custom Tab”. If you examine the code, you will see that a class name show_if_simple is being added, This helps WooCommerce to automatically show or hide certain elements on the page that have related classes. A couple of available HTML classes that you can add to elements;
show_if_simple / hide_if_simple / show_if_variable / show_if_downloadable / hide_if_virtual
In the following code, the custom Tab will only be visible for the Simple product type.
// First Register the Tab by hooking into the 'woocommerce_product_data_tabs' filter
add_filter( 'woocommerce_product_data_tabs', 'add_my_custom_product_data_tab' );
function add_my_custom_product_data_tab( $product_data_tabs ) {
    $product_data_tabs['my-custom-tab'] = array(
        'label' => __( 'My Custom Tab', 'woocommerce' ),
        'target' => 'my_custom_product_data',
        'class'     => array( 'show_if_simple' ),
    );
    return $product_data_tabs;
}

/** CSS To Add Custom tab Icon */
function wcpp_custom_style() {?>
<style>
#woocommerce-product-data ul.wc-tabs li.my-custom-tab_options a:before { font-family: WooCommerce; content: '\e006'; }
</style>
<!--?php
}
add_action( 'admin_head', 'wcpp_custom_style' );
Step 2: Adding Fields to the New Custom Tab

This code snippets below are copied from my other post on How to Add WooCommerce Custom Fields to Products
// functions you can call to output text boxes, select boxes, etc.
add_action('woocommerce_product_data_panels', 'woocom_custom_product_data_fields');

function woocom_custom_product_data_fields() {
    global $post;

    // Note the 'id' attribute needs to match the 'target' parameter set above
    ?> <div id = 'my_custom_product_data'
    class = 'panel woocommerce_options_panel' > <?php
        ?> <div class = 'options_group' > <?php
              // Text Field
  woocommerce_wp_text_input(
    array(
      'id' => '_text_field',
      'label' => __( 'Custom Text Field', 'woocommerce' ),
      'wrapper_class' => 'show_if_simple', //show_if_simple or show_if_variable
      'placeholder' => 'Custom text field',
      'desc_tip' => 'true',
      'description' => __( 'Enter the custom value here.', 'woocommerce' )
    )
  );

  // Number Field
  woocommerce_wp_text_input(
    array(
      'id' => '_number_field',
      'label' => __( 'Custom Number Field', 'woocommerce' ),
      'placeholder' => '',
      'description' => __( 'Enter the custom value here.', 'woocommerce' ),
      'type' => 'number',
      'custom_attributes' => array(
         'step' => 'any',
         'min' => '15'
      )
    )
  );

  // Checkbox
  woocommerce_wp_checkbox(
    array(
      'id' => '_checkbox',
      'label' => __('Custom Checkbox Field', 'woocommerce' ),
      'description' => __( 'Check me!', 'woocommerce' )
    )
  );

  // Select
  woocommerce_wp_select(
    array(
      'id' => '_select',
      'label' => __( 'Custom Select Field', 'woocommerce' ),
      'options' => array(
         'one' => __( 'Custom Option 1', 'woocommerce' ),
         'two' => __( 'Custom Option 2', 'woocommerce' ),
        'three' => __( 'Custom Option 3', 'woocommerce' )
      )
    )
  );

  // Textarea
  woocommerce_wp_textarea_input(
     array(
       'id' => '_textarea',
       'label' => __( 'Custom Textarea', 'woocommerce' ),
       'placeholder' => '',
       'description' => __( 'Enter the value here.', 'woocommerce' )
     )
 );
        ?> </div>

    </div><?php
}

/** Hook callback function to save custom fields information */
function woocom_save_proddata_custom_fields($post_id) {
    // Save Text Field
    $text_field = $_POST['_text_field'];
    if (!empty($text_field)) {
        update_post_meta($post_id, '_text_field', esc_attr($text_field));
    }

    // Save Number Field
    $number_field = $_POST['_number_field'];
    if (!empty($number_field)) {
        update_post_meta($post_id, '_number_field', esc_attr($number_field));
    }
    // Save Textarea
    $textarea = $_POST['_textarea'];
    if (!empty($textarea)) {
        update_post_meta($post_id, '_textarea', esc_html($textarea));
    }

    // Save Select
    $select = $_POST['_select'];
    if (!empty($select)) {
        update_post_meta($post_id, '_select', esc_attr($select));
    }

    // Save Checkbox
    $checkbox = isset($_POST['_checkbox']) ? 'yes' : 'no';
    update_post_meta($post_id, '_checkbox', $checkbox);

    // Save Hidden field
    $hidden = $_POST['_hidden_field'];
    if (!empty($hidden)) {
        update_post_meta($post_id, '_hidden_field', esc_attr($hidden));
    }
}

add_action( 'woocommerce_process_product_meta_simple', 'woocom_save_proddata_custom_fields'  );

// You can uncomment the following line if you wish to use those fields for "Variable Product Type"
//add_action( 'woocommerce_process_product_meta_variable', 'woocom_save_proddata_custom_fields'  );
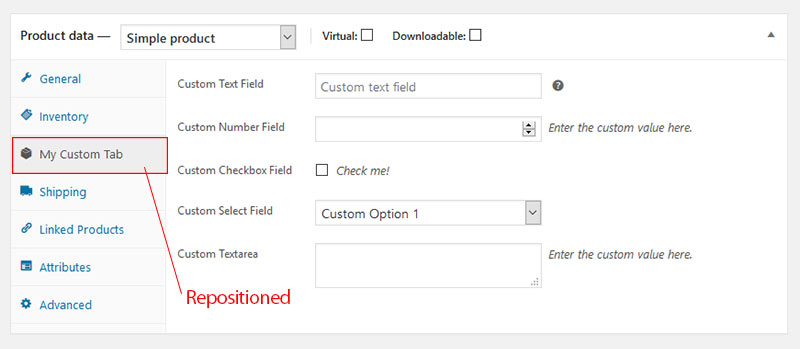
Optional: Repositioning the Tab in Tab Panel

To reposition you need to replace the woocom_custom_product_data_tab function that was created in Step 1 with the snippets below.
function woocom_custom_product_data_tab( $original_prodata_tabs) {
    $new_custom_tab['my-custom-tab'] = array(
        'label' => __( 'My Custom Tab', 'woocommerce' ),
        'target' => 'my_custom_product_data_tab',
        'class'     => array( 'show_if_simple', 'show_if_variable'  ),
    );
    $insert_at_position = 2; // Change this for desire position
    $tabs = array_slice( $original_prodata_tabs, 0, $insert_at_position, true ); // First part of original tabs
    $tabs = array_merge( $tabs, $new_custom_tab ); // Add new
    $tabs = array_merge( $tabs, array_slice( $original_prodata_tabs, $insert_at_position, null, true ) ); // Glue the second part of original
    return $tabs;
}


9 Comments
You can post comments in this post.
Thanks very much for this very helpful article. Exactly what we need !
Aurélien Sanrey 8 years ago
Hi, i am wondering, after i created all this, which worked great btw. how can we then show it in the product page? I like to see this article to go further so we can also add it on the front page.
Mike 7 years ago
Hi,
Thanks for this tuto.
I have question…. i add a fileds in product page like you … to work fine … but i want to add product with API but i can’t add value to this fileds ?
Sorry for my bad english …
marotn 7 years ago
Nice article. But you forgot to verify when the _POST data is updated / different than stored data.
George 7 years ago
Hi tnx for the tutorials , nice article. is there any option to create a custom field for a particular category.
Rajiv 7 years ago
I plugged all of the code into the functions.php file and the tab appears but the fields don’t?? Need some help figuring out why.
Nick 7 years ago
Isn’t easier to just use ‘priority’ parameter to display tab in desired position ?
Tahi Reu 6 years ago
thats amazing
jasbir 6 years ago
i need custom upload image field for woocommerce product add / edit page
saravanan 6 years ago
Leave A Reply